A new lawn can transform a property’s appearance, but the quality of the grass alone does not determine how well it grows. Beneath every successful lawn is soil that allows roots to establish, water to move properly, and nutrients to reach the developing grass. Without that foundation, even fresh, healthy sod can struggle shortly after installation.
For homeowners considering sod installation Dallas, preparation is one of the most important parts of the process. Dallas-area conditions, including hot summers, periods of heavy rainfall, and compacted soil around residential properties, can create challenges for newly installed grass. Addressing these issues before laying sod helps create a lawn that establishes more evenly and requires fewer corrections later.
Why Soil Preparation Matters Before Laying New Sod
Sod arrives with an established layer of grass and roots, but those roots still need to connect with the soil beneath them. The transition between the sod and the prepared ground determines how easily moisture, air, and nutrients move into the root zone.
If the ground is hard, uneven, or poorly drained, roots may have difficulty spreading beyond the original sod layer. This can leave sections of grass struggling even when the lawn appears green immediately after installation.
Proper preparation creates a consistent surface and improves the conditions needed for root development. It also helps prevent common problems such as standing water, dry patches, uneven growth, and gaps between sod pieces.
Several benefits make this stage especially important:
- Stronger root establishment: Loose, properly prepared soil allows roots to penetrate the ground more easily.
- More consistent moisture: Improved soil structure helps water reach the root zone instead of running off hard surfaces.
- A smoother lawn surface: Removing bumps and filling low spots creates a more even appearance.
- Fewer future repairs: Addressing soil problems before installation reduces the likelihood of having to replace struggling sections later.
These advantages are not limited to large yards. Even a small residential lawn can benefit from careful preparation, particularly where construction activity, foot traffic, or previous landscaping has disturbed the ground.
Understanding Dallas Soil Conditions Before Installation
Not every property has the same soil composition. Some yards contain dense clay that holds moisture and becomes difficult to work with when wet. Others have areas of compacted fill soil, shallow topsoil, or a mixture of materials left behind after construction.
These differences affect how sod should be installed. A preparation method that works well in one yard may not be appropriate for another.
Dealing With Heavy or Compacted Soil
Clay-heavy soil can present two opposing challenges. When it becomes saturated, water may drain slowly, leaving the ground wet for extended periods. During dry weather, the same soil can become hard and difficult for young roots to penetrate.
Compaction makes these issues more difficult. Repeated foot traffic, construction equipment, and vehicle movement can press soil particles together, reducing the spaces through which air and water normally move.
Before installing new grass, homeowners should check whether the ground is compacted. A simple inspection with a hand trowel or soil probe can reveal whether the soil is easy to penetrate or unusually dense.
Depending on the conditions, preparation may involve loosening the upper soil layer, correcting grading issues, or incorporating suitable soil amendments. Adding sand indiscriminately to clay soil is not a reliable solution and can produce an undesirable soil structure. Any amendment should be selected according to the actual condition of the ground.
Checking Existing Topsoil
Topsoil provides much of the environment that supports early root development. If a property has very little usable topsoil, roots may encounter dense subsoil soon after leaving the sod layer.
Homeowners should look for areas where the ground appears unusually pale, hard, rocky, or mixed with construction debris. These conditions may indicate that the original topsoil was removed or disturbed.
A soil test can provide useful information about pH and nutrient availability. Instead of applying fertilizer or amendments based on guesswork, homeowners can use the results to identify what the soil actually needs.
Preparing the Ground for Sod Installation Dallas
Successful preparation involves more than raking the yard and placing grass on top. Each stage helps create a stable surface where roots can establish without unnecessary obstacles.
1. Remove Existing Grass, Weeds, and Debris
Old turf and weeds can interfere with the new lawn if they remain beneath the sod. Some weeds may continue growing through gaps, while leftover plant material can create an inconsistent surface.
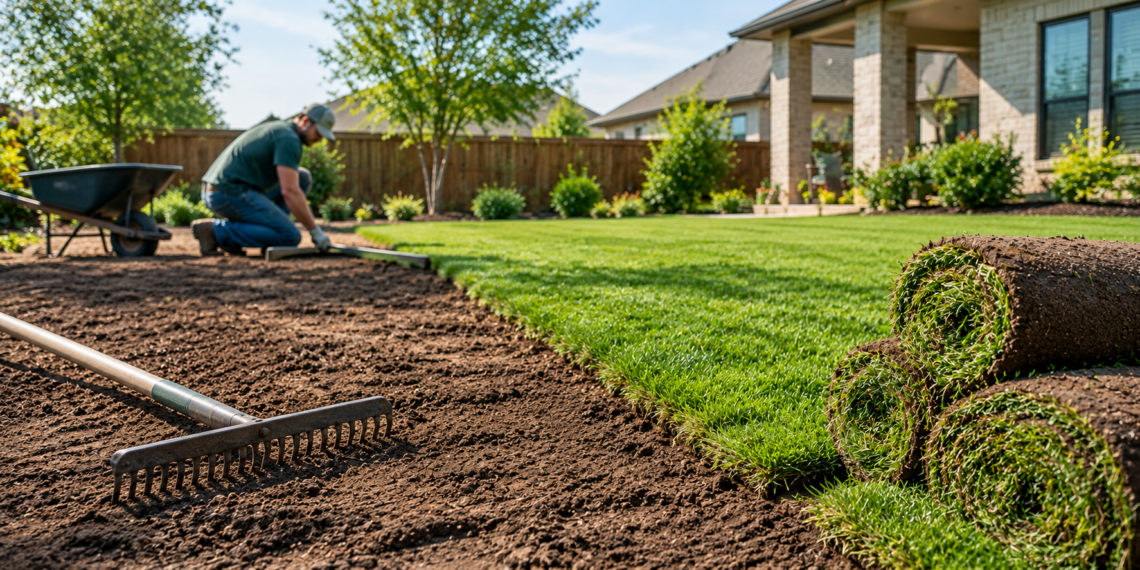
Start by removing unwanted vegetation, rocks, sticks, and construction debris. If existing grass is heavily damaged or contains persistent weeds, removing the old turf completely may be more effective than covering it.
The preparation process should also include checking for irrigation heads, shallow utility lines, edging, and other features that could become buried or damaged during grading.
A clean surface makes it easier to identify low areas, compacted sections, and drainage concerns before installation begins.
2. Loosen the Soil Where Necessary
Once debris and unwanted vegetation have been removed, the next step is to evaluate soil firmness. The objective is to create a workable root zone without disturbing the ground unnecessarily.
For a typical residential lawn, loosening the upper several inches of soil may be appropriate, depending on the existing condition and site requirements. Severely compacted areas may need more attention than sections that are already loose and well structured.
Avoid working the soil when it is excessively wet. Wet clay can smear and compact under equipment, creating a dense layer that becomes difficult for roots and water to penetrate. Waiting until the soil is workable can produce a better result.
3. Correct Low Spots and Uneven Areas
A lawn can look attractive immediately after installation but develop noticeable problems if the underlying grade is inconsistent. Low areas may collect water, while raised sections can dry out more quickly or create mowing difficulties.
During grading, soil should be redistributed to create a smooth, stable surface with appropriate drainage away from the house. The final grade must also account for sidewalks, driveways, patios, and existing landscape borders.
Pay particular attention to areas near foundations and downspouts. Water should not be directed toward the home, and existing drainage paths should remain functional.
4. Improve Soil Structure and Nutrient Availability
Not every yard needs additional topsoil or fertilizer. The right approach depends on soil depth, texture, nutrient levels, and the condition of the existing ground.
If the soil test identifies a nutrient deficiency or an unsuitable pH, appropriate amendments can be incorporated before the sod is placed. If the soil is shallow or contains substantial debris, adding suitable screened topsoil may be necessary.
Avoid creating a thin layer of loose material over extremely hard ground. That approach can leave roots growing mainly within the added layer rather than establishing deeply in the soil below.
Why Drainage and Grading Should Be Addressed First
Water management deserves special attention in North Texas. A lawn may experience intense rainfall during one period and extended dry weather during another. Poor grading can make both situations harder to manage.
When water collects in low spots, the soil can remain saturated and limit the oxygen available to roots. On the other hand, sloped or compacted surfaces may cause water to run away before it can soak into the ground.
Before proceeding with sod installation Dallas, homeowners should identify how water moves across the property after rainfall or irrigation.
Look for these warning signs:
- Puddles that remain long after surrounding areas have dried.
- Soil erosion near slopes, downspouts, or property edges.
- Water flowing toward the house instead of away from it.
- Areas where grass repeatedly struggles despite regular watering.
The solution may involve adjusting the grade, improving the soil structure, redirecting downspout discharge, or installing a suitable drainage system. The appropriate fix depends on the cause. Simply adding more soil over a wet area may conceal the problem without correcting it.
Drainage work should also respect property boundaries and existing drainage requirements. Redirecting runoff into a neighbor’s yard can create new problems rather than solving the original one.
Choosing the Right Sod for the Prepared Soil
Soil preparation and grass selection should be considered together. Different grass varieties have different sunlight, water, and maintenance requirements, so the best choice depends on the property’s conditions.
Bermudagrass is commonly used in sunny Texas lawns because it handles heat and regular use well when properly maintained. St. Augustinegrass is another option for some residential landscapes, particularly where partial shade is present, although its performance depends on the specific variety and growing conditions.
Before selecting sod, consider:
- Sunlight exposure: Observe how many hours of direct sunlight different parts of the yard receive.
- Water availability: Consider irrigation coverage and whether the property can support the grass’s moisture needs.
- Expected use: Family activities, pets, and frequent foot traffic may influence the best grass choice.
- Maintenance expectations: Mowing height, fertilizer needs, and seasonal care vary by grass type.
Soil preparation cannot compensate for a grass variety that is poorly suited to the site. Likewise, selecting the right grass will not overcome severe drainage problems or a heavily compacted root zone. Both decisions need to work together.
The Role of Professional Preparation
Some homeowners can prepare a small, relatively level lawn themselves. Larger properties, uneven terrain, compacted construction soil, and recurring drainage problems may require specialized equipment and experience.
A professional assessment can help determine how much soil needs to be removed, whether amendments are appropriate, and how the final grade should be shaped. This is especially valuable when the yard has multiple elevations or water-management issues that are not obvious at first glance.
Homeowners considering sod installation Dallas can consult The Grounds Guys of Dallas, Park Cities & Lakewood for guidance on lawn preparation and landscaping needs. Professional assistance can help identify site-specific concerns before new grass is laid, making it easier to plan the work around the property’s soil, grading, and lawn requirements.
The goal is not to make every yard follow the same preparation process. It is to match the work to the conditions already present, avoiding unnecessary expense while addressing issues that could prevent the new lawn from establishing properly.
Common Soil Preparation Mistakes to Avoid
A rushed installation can create problems that are difficult to correct once the grass is in place. Many of these mistakes happen because the visible condition of the yard receives more attention than the soil underneath it.
Leaving Compacted Soil Untreated
Laying sod over dense ground can restrict root development and make water movement less predictable. If the soil is hard enough to resist normal cultivation, that condition should be addressed before installation.
Ignoring the Final Grade
A smooth-looking surface is not enough if the grade directs water toward the foundation or leaves depressions across the lawn. Grading should be checked before the sod arrives, when adjustments are still straightforward.
Applying Too Much Fertilizer
More fertilizer does not automatically mean faster establishment. Excessive or inappropriate applications can damage new grass or contribute to nutrient runoff. Soil testing and product directions should guide fertilizer use.
Installing Sod Over Dry or Poorly Prepared Ground
Dry soil can make it harder for the sod roots to establish contact with the underlying ground. Before laying the grass, the soil should be appropriately prepared and slightly moist rather than dusty or saturated.
Failing to Plan for Irrigation
New sod needs consistent moisture during establishment. If sprinkler coverage is uneven, some sections may dry out while others receive too much water. Test the irrigation system before installation and correct coverage problems early.
Caring for the Soil After Sod Is Installed
Preparation does not end when the final piece of sod is laid. The first several weeks are important because the grass must develop roots that connect with the soil beneath it.
Watering is one of the most important responsibilities during this period. The sod and underlying soil should receive enough moisture to support establishment, but the ground should not remain constantly saturated. Weather, soil type, grass variety, and irrigation coverage all affect how frequently watering is needed.
As the roots begin to establish, watering practices can gradually shift toward deeper applications at appropriate intervals, subject to weather conditions and local watering restrictions.
Homeowners should also avoid unnecessary foot traffic while the sod is settling. Walking repeatedly over wet ground can compact the soil and disturb the new grass. Mowing should wait until the sod has rooted sufficiently to resist being lifted by the mower or pulled loose during turns.
Other useful practices include:
- Check for gaps or edges that begin to dry out.
- Watch for standing water after heavy rain or irrigation.
- Follow grass-specific recommendations for the first mowing.
- Avoid heavy equipment or activities that compress the newly prepared ground.
If sections remain yellow, loose, or poorly rooted, investigate the cause rather than automatically applying more fertilizer. Uneven watering, poor soil contact, excessive moisture, and unsuitable site conditions can all contribute to establishment problems.
Long-Term Benefits of Getting the Foundation Right
Good soil preparation supports more than the lawn’s initial appearance. It helps create conditions for consistent growth, more effective watering, and easier routine maintenance.
A well-established lawn can still encounter weeds, seasonal stress, pests, or weather-related damage. Preparation does not eliminate every future problem, but it reduces the risk that preventable soil issues will undermine the grass from the beginning.
It can also make future maintenance more manageable. Even grading supports more consistent mowing, while improved infiltration may help irrigation water reach the root zone. Where drainage and soil structure have been properly addressed, homeowners are less likely to face repeated repairs caused by the same underlying issue.
The value of sod installation Dallas should therefore be judged by more than how green the yard looks on installation day. Root development, drainage performance, and the lawn’s ability to handle ordinary seasonal conditions are better indicators of long-term success.
Frequently Asked Questions
How deep should soil be prepared before installing sod?
The required preparation depth depends on existing soil conditions and the grass being installed. For many residential lawns, loosening the upper several inches can help roots establish, but severely compacted or shallow soil may require additional work.
Should I add topsoil before laying sod?
Not every yard needs additional topsoil. It may be useful where the existing soil is shallow, depleted, or mixed with construction debris, but the material should be suitable for turf growth and blended appropriately with the existing ground.
Can sod be installed over existing grass?
Removing existing grass is generally preferable because it provides a more consistent surface and reduces the chance of weeds or old turf interfering with establishment. Covering an existing lawn can also create unevenness and poor contact between the new sod and the soil.
How long does new sod take to establish roots?
Root establishment depends on the grass variety, season, weather, watering, and soil conditions. New sod may begin rooting within the first couple of weeks, but full establishment can take longer, so it should be checked before normal foot traffic and mowing resume.
Is a soil test necessary before sod installation?
A soil test is useful because it can identify pH and nutrient conditions that affect grass growth. It is particularly helpful when the yard has a history of poor performance or when homeowners are unsure which amendments are needed.
What is the biggest soil preparation mistake?
Ignoring compaction and drainage is among the most costly mistakes. Even high-quality sod can struggle when roots cannot penetrate the ground or when water repeatedly collects around the root zone.
Conclusion
A successful lawn begins below the surface. Removing debris, loosening compacted areas, correcting the grade, and addressing soil deficiencies create the conditions new grass needs to establish strong roots. These steps are particularly important in Dallas, where soil conditions and changing weather can place different demands on residential lawns.
For homeowners planning sod installation Dallas, careful preparation is an investment in the lawn’s long-term performance, not an optional extra. By understanding the property before laying sod, selecting grass suited to its conditions, and following appropriate establishment practices, homeowners can give their new lawn a much stronger start and reduce the risk of avoidable problems later.